
By:prayag nao
Ultrasonic distance sensors are designed to measure distance between the source and target using ultrasonic waves. We use ultrasonic waves because they are relatively accurate across short distances and don’t cause disturbances as they are inaudible to human ear.
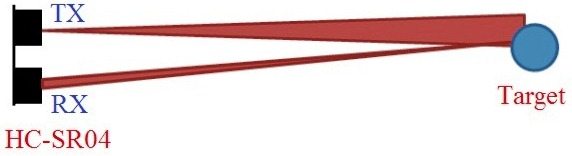
HC-SR04 is a commonly used module for non contact distance measurement for distances from 2cm to 400cm. It uses sonar (like bats and dolphins) to measure distance with high accuracy and stable readings. It consist of an ultrasonic transmitter, receiver and control circuit. The transmitter transmits short bursts which gets reflected by target and are picked up by the receiver. The time difference between transmission and reception of ultrasonic signals is calculated. Using the speed of sound and ‘Speed = Distance/Time‘ equation, the distance between the source and target can be easily calculated.
HC-SR04 ultrasonic distance sensor module has four pins :
 Distance is measured every two seconds and displayed.
Ultrasonic distance sensors are designed to measure distance between the source and target using ultrasonic waves. We use ultrasonic waves because they are relatively accurate across short distances and don’t cause disturbances as they are inaudible to human ear.
HC-SR04 is a commonly used module for non contact distance measurement for distances from 2cm to 400cm. It uses sonar (like bats and dolphins) to measure distance with high accuracy and stable readings. It consist of an ultrasonic transmitter, receiver and control circuit. The transmitter transmits short bursts which gets reflected by target and are picked up by the receiver. The time difference between transmission and reception of ultrasonic signals is calculated. Using the speed of sound and ‘Speed = Distance/Time‘ equation, the distance between the source and target can be easily calculated.
HC-SR04 ultrasonic distance sensor module has four pins :
- VCC – 5V, input power
- TRIG – Trigger Input
- ECHO – Echo Output
- GND – Ground
- Provide trigger signal to TRIG input, it requires a HIGH signal of atleast 10μS duration.
- This enables the module to transmit eight 40KHz ultrasonic burst.
- If there is an obstacle in-front of the module, it will reflect those ultrasonic waves
- If the signal comes back, the ECHO output of the module will be HIGH for a duration of time taken for sending and receiving ultrasonic signals. The pulse width ranges from 150μS to 25mS depending upon the distance of the obstacle from the sensor and it will be about 38ms if there is no obstacle.
Calibration
For accurate distance readings the output can be calibrated using a ruler. In the below program a calibration of 0.5 cm is addedPython Programming
import RPi.GPIO as GPIO                    #Import GPIO library
import time                                #Import time library
GPIO.setmode(GPIO.BCM)                     #Set GPIO pin numbering

TRIG = 23                                  #Associate pin 23 to TRIG
ECHO = 24                                  #Associate pin 24 to ECHO

print "Distance measurement in progress"

GPIO.setup(TRIG,GPIO.OUT)                  #Set pin as GPIO out
GPIO.setup(ECHO,GPIO.IN)                   #Set pin as GPIO in

while True:

  GPIO.output(TRIG, False)                 #Set TRIG as LOW
  print "Waitng For Sensor To Settle"
  time.sleep(2)                            #Delay of 2 seconds

  GPIO.output(TRIG, True)                  #Set TRIG as HIGH
  time.sleep(0.00001)                      #Delay of 0.00001 seconds
  GPIO.output(TRIG, False)                 #Set TRIG as LOW

  while GPIO.input(ECHO)==0:               #Check whether the ECHO is LOW
    pulse_start = time.time()              #Saves the last known time of LOW pulse

  while GPIO.input(ECHO)==1:               #Check whether the ECHO is HIGH
    pulse_end = time.time()                #Saves the last known time of HIGH pulse

  pulse_duration = pulse_end - pulse_start #Get pulse duration to a variable

  distance = pulse_duration * 17150        #Multiply pulse duration by 17150 to get distance
  distance = round(distance, 2)            #Round to two decimal points

  if distance > 2 and distance < 400:      #Check whether the distance is within range
    print "Distance:",distance - 0.5,"cm"  #Print distance with 0.5 cm calibration
  else:
    print "Out Of Range"                   #display out of range
Run above program.
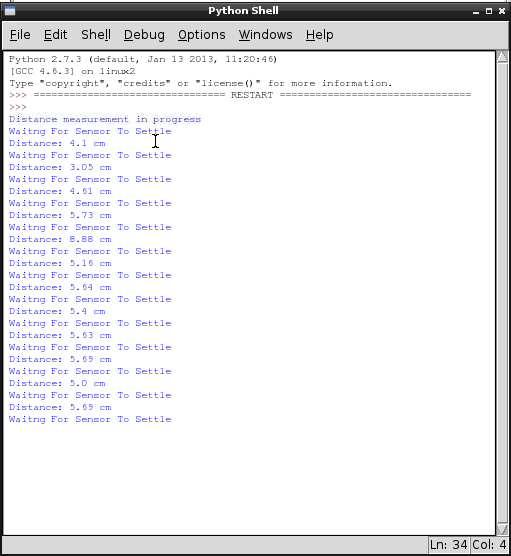
Output
Ultrasonic distance sensor output
Comments
Post a Comment