
By:Prayag Nao
All living beings radiate energy to the surroundings in the form of infrared radiations which are invisible to human eyes. A PIR (Passive infrared) sensor can be used to detect these passive radiations. When an object (human or animal) emitting infrared radiations passes through the field of view of the sensor, it detects the change in temperature and therefore can be used to detect motion.
HC-SR501 uses differential detection with two pyroelectric infrared sensors. By taking difference of the values, the average temperature from the field of view of sensor is removed and thereby reducing false positives.
Interfacing HC-SR501 with Raspberry Pi is easy because the output of sensor is Pi friendly ie. 3.3V and it can be powered from the 5V rail of Pi.
The PIR sensor consist of 3 pins:
The module has a rectangular window with two sub probes 1 and 2 located at two ends of the rectangle. When a body emitting infrared radiation moves from side to side, the time for each probe for detection varies. Larger the time difference, more sensitive the device. It also uses a Fresnel lens to improve sensing aperture and filter in infrared waves.
save program as PIR.py.
Run the above program.
Note: The program can be calibrated for smaller detection (hardware) delay by using smaller Program delay(D1).
Output
you will see "Motion Detected" printing on screen when any motion detected by sensor.
Any doubts or suggestions? Comment below.
All living beings radiate energy to the surroundings in the form of infrared radiations which are invisible to human eyes. A PIR (Passive infrared) sensor can be used to detect these passive radiations. When an object (human or animal) emitting infrared radiations passes through the field of view of the sensor, it detects the change in temperature and therefore can be used to detect motion.
HC-SR501 uses differential detection with two pyroelectric infrared sensors. By taking difference of the values, the average temperature from the field of view of sensor is removed and thereby reducing false positives.
Interfacing HC-SR501 with Raspberry Pi is easy because the output of sensor is Pi friendly ie. 3.3V and it can be powered from the 5V rail of Pi.
The PIR sensor consist of 3 pins:
- Vcc – 4.5V to 20V, Input power
- OUTPUT – TTL output of sensor 0V, 3.3V
- GND – Ground
Working of HC-SR501 PIR sensor
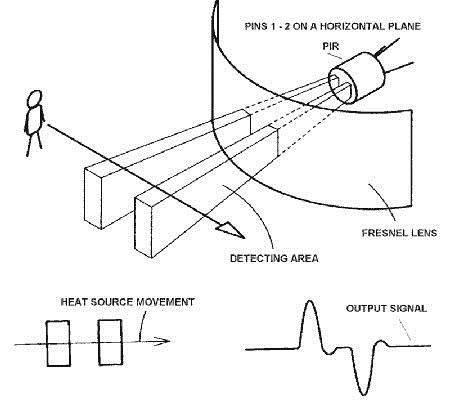
The module has a rectangular window with two sub probes 1 and 2 located at two ends of the rectangle. When a body emitting infrared radiation moves from side to side, the time for each probe for detection varies. Larger the time difference, more sensitive the device. It also uses a Fresnel lens to improve sensing aperture and filter in infrared waves.
Adjustment
- For adjusting the detection delay (0.3 seconds to 600 seconds): Turn the potentiometer clockwise to increase and anticlockwise to decrease
- For adjusting the sensing distance (3 meters to 7 meters): Turn the potentiometer clockwise to increase and anticlockwise to decrease
Circuit Connections
Vcc, Output, Ground are connected to 2 (5V), 26 (GPIO) and 6 (GND) pins of Pi respectively.
Python Program
Open text editor of raspberry pi and copy and paste following program into it.import RPi.GPIO as GPIO #Import GPIO library
import time #Import time library
GPIO.setmode(GPIO.BOARD) #Set GPIO pin numbering
pir = 26 #Associate pin 26 to pir
GPIO.setup(pir, GPIO.IN) #Set pin as GPIO in
print "Waiting for sensor to settle"
time.sleep(2) #Waiting 2 seconds for the sensor to initiate
print "Detecting motion"
while True:
if GPIO.input(pir): #Check whether pir is HIGH
print "Motion Detected!"
time.sleep(2) #D1- Delay to avoid multiple detection
time.sleep(0.1) #While loop delay should be less than detection(hardware) delay
save program as PIR.py.
Run the above program.
Note: The program can be calibrated for smaller detection (hardware) delay by using smaller Program delay(D1).
Output
you will see "Motion Detected" printing on screen when any motion detected by sensor.
Any doubts or suggestions? Comment below.
Comments
Post a Comment